How Long To Leave Cast Iron In Oven When Seasoning
Learning how long to leave cast iron in oven when seasoning is the key to building a durable, non-stick surface. Most experts recommend baking your cast iron at 450°F to 500°F for about one hour per seasoning layer. The exact time depends on the type of oil you use, the number of layers you want, and whether you are seasoning a new skillet or re-seasoning an old one. This guide covers everything you need to know, from preparation to maintenance.
Cast iron cookware is one of the most durable and versatile tools you can have in your kitchen. A well-seasoned cast iron skillet heats evenly, cooks food beautifully, and lasts for generations. But here is the thing — seasoning is not a one-time deal. You need to maintain it, and sometimes start from scratch.
If you have ever wondered how long to leave cast iron in oven when seasoning, you are not alone. This is one of the most common questions home cooks ask. The answer might surprise you because it depends on a few simple factors like temperature, oil type, and how many layers you want to build.
In this guide, we will walk you through the entire process step by step. You will learn the best oven temperature, how long each layer needs to bake, which oils work best, and how to avoid common mistakes. Whether you are seasoning a brand new Lodge skillet or bringing an old pan back to life, this article has you covered.
By the end, you will feel confident about your cast iron seasoning skills. You will know exactly how long to leave your pan in the oven, what to expect during the process, and how to keep your seasoning strong for years to come. Let us dive in.
Key Takeaways
- Bake at 450°F to 500°F: This temperature range works best for most oils and creates a strong polymerized coating.
- One hour per layer: Leave your cast iron in the oven for about 60 minutes per seasoning coat.
- Thin layers matter: Wipe off excess oil before baking to avoid sticky buildup.
- Multiple layers build durability: 3 to 6 layers create a solid, long-lasting seasoning.
- Cool inside the oven: Let the skillet cool down gradually to prevent thermal shock.
- Use high-smoke-point oils: Flaxseed oil, Crisco, and grapeseed oil work great for oven seasoning.
- Re-season regularly: Maintenance seasoning keeps your cast iron in top shape for years.
📑 Table of Contents
- Why Cast Iron Seasoning Matters
- Best Oven Temperature for Seasoning Cast Iron
- Step-by-Step Oven Seasoning Process
- How Long Each Seasoning Layer Needs to Bake
- How Many Times Should You Season Cast Iron
- Common Mistakes to Avoid When Seasoning Cast Iron
- How to Tell When Your Cast Iron Is Fully Seasoned
- Quick Tips for Maintaining Your Seasoned Cast Iron
- Final Thoughts on How Long to Leave Cast Iron in Oven When Seasoning
Why Cast Iron Seasoning Matters
Before we get into timing and temperatures, it helps to understand what seasoning actually does. Seasoning is the process of baking a thin layer of oil onto the surface of your cast iron. When the oil heats past its smoke point, it breaks down and bonds with the metal. This creates a hard, smooth, non-stick coating that protects the pan from rust and makes cooking easier.
Without proper seasoning, cast iron can rust, food sticks badly, and the pan loses its cooking performance. A good seasoning layer also adds flavor over time, especially when you cook fatty foods like bacon or burgers. Think of it like building a natural non-stick pan inside your cast iron.
The seasoning process relies on a chemical reaction called polymerization. The heat from your oven causes the fatty acids in the oil to link together and form a hard plastic-like layer on the surface. This is why oven temperature and timing matter so much. Too low and the oil will not polymerize properly. Too high and it can burn and become sticky or flaky.
Understanding this process makes it much easier to follow the right timing and temperature guidelines. It also helps you troubleshoot when something goes wrong. Now let us look at the best oven temperature for seasoning cast iron.
What Is Polymerization?
Polymerization is the science behind seasoning. When you heat oil past its smoke point, the molecules rearrange and form long chains. These chains bond to the iron surface and to each other. The result is a hard, glossy, protective layer that makes your pan non-stick.
Different oils polymerize at different rates. Oils with higher smoke points tend to create harder, more durable layers. This is why choosing the right oil is just as important as getting the time and temperature right. We will cover oil choices in more detail later in this article.
Best Oven Temperature for Seasoning Cast Iron
The sweet spot for oven seasoning cast iron is between 450°F and 500°F. This range is hot enough to fully polymerize most cooking oils without burning them. Most oven seasoning guides recommend 500°F as the ideal temperature because it speeds up the process and creates a harder finish.
However, some people prefer a lower temperature of 450°F. This works well too, especially if you are using an oil with a lower smoke point. The trade-off is that each layer takes a bit longer to set properly. Either temperature will get the job done as long as you follow the timing guidelines.
Here are a few things to keep in mind about temperature:
- Always preheat your oven: Do not put the cold skillet in and then turn the heat on. Preheating ensures even heat distribution.
- Use an oven thermometer: Many ovens run hot or cold. An inexpensive oven thermometer helps you get the exact temperature you need.
- Avoid going above 500°F: Higher temperatures can cause the oil to burn before it polymerizes, leaving a sticky or flaky mess.
- Keep your kitchen ventilated: The seasoning process produces smoke, especially at higher temperatures. Open a window or turn on your range hood.
Getting the temperature right is the foundation of a great seasoning job. Once you nail that, the next thing to focus on is how long to leave cast iron in oven when seasoning.
Step-by-Step Oven Seasoning Process
Now that you know the temperature, let us walk through the full process. This is the method most cast iron experts and seasoning guides recommend. Follow these steps and you will get great results every time.
Step 1: Clean Your Cast Iron
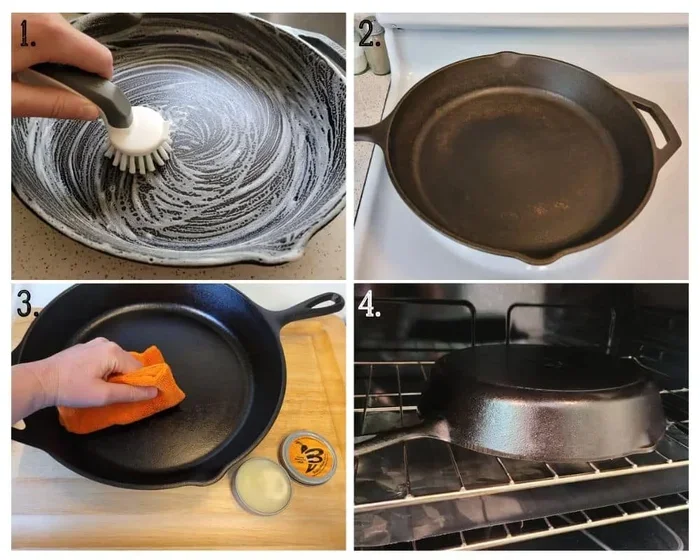
Start with a clean surface. If you are seasoning a brand new skillet, wash it with warm water and a small amount of dish soap. Dry it completely with a towel or dry it on the stove over low heat. If you are re-seasoning an old pan, remove any rust or old seasoning first. You can use steel wool, a chainmail scrubber, or a stiff brush.
Make sure the pan is completely dry before you move to the next step. Any moisture left on the surface can cause rust during the seasoning process. Some people even place the clean pan in a warm oven for a few minutes to make sure every drop of water has evaporated.
Step 2: Apply a Thin Layer of Oil
This is where most people go wrong. They use too much oil, which leads to a sticky, uneven coating. You want a very thin layer. Pour a small amount of oil onto a paper towel or a clean cloth and wipe the entire surface of the skillet, inside and out.
The surface should look lightly shiny, not wet or pooled with oil. If you see drips or puddles, you have used too much. Wipe it off with a dry cloth and apply less oil next time.
Here are some of the best oils for cast iron seasoning:
- Flaxseed oil: Creates a very hard seasoning layer. It polymerizes well at high temperatures.
- Crisco shortening: A popular choice because it is cheap, easy to apply, and produces great results.
- Grapeseed oil: Has a high smoke point and creates a durable finish.
- Sunflower oil: Another affordable option with good polymerization properties.
- Avocado oil: High smoke point and produces a smooth, hard layer.
Step 3: Place the Skillet Upside Down in the Oven
Place your oiled skillet upside down on the middle oven rack. This allows excess oil to drip off during baking, which prevents pooling and sticky spots. Place a sheet of aluminum foil on the rack below to catch any drips and keep your oven clean.
Now the big question: how long to leave cast iron in oven when seasoning? Put your oven mitts on and let us get into the timing details.
Step 4: Bake and Cool
Bake the skillet at 450°F to 500°F for the recommended time. When the timer goes off, turn off the oven but do not open the door right away. Let the skillet cool inside the oven as the oven cools down naturally. This gradual cooling helps the seasoning layer set properly and prevents thermal shock that can crack or warp the pan.
Once the oven is completely cool, remove the skillet. It should feel smooth and dry to the touch. If it still feels tacky or oily, you may have applied too much oil or not baked it long enough.
How Long Each Seasoning Layer Needs to Bake
This is the heart of the question. How long to leave cast iron in oven when seasoning depends on how many layers you are building and what temperature you are using.
For a single layer at 500°F, one hour is usually enough. At 450°F, you might want to extend that to 75 minutes. The goal is to give the oil enough time to fully polymerize and bond with the iron surface.
If you are building multiple layers, you will repeat the process. Most experts recommend 3 to 6 layers for a solid seasoning base. That means 3 to 6 one-hour baking sessions. It sounds like a lot, but each layer only takes about an hour, and the results are worth it.
Here is a simple breakdown of seasoning time based on temperature and layers:
- One layer at 500°F: 60 minutes
- One layer at 450°F: 75 minutes
- Three layers at 500°F: 3 hours total (plus cooling time)
- Six layers at 500°F: 6 hours total (plus cooling time)
- Re-seasoning touch-up: 30 to 45 minutes at 500°F
Keep in mind that the cooling time adds to the total process. A full six-layer seasoning session can take an entire day if you let the oven cool between each layer. Some people prefer to do all layers back to back without cooling, which cuts the total time significantly.
Doing layers back to back works well if your oven stays at a consistent temperature. Just make sure each layer is thin and properly wiped before adding the next one. You can apply 2 to 3 layers in a single session without issues.
How to Apply Multiple Layers in One Session
If you want to speed things up, you can apply multiple layers in one oven session. Here is how:
- Apply the first thin layer of oil and bake for one hour.
- Remove the skillet and let it cool for 10 to 15 minutes.
- Apply the next thin layer of oil.
- Place it back in the oven for another hour.
- Repeat until you have reached your desired number of layers.
This method saves time and builds up a nice thick seasoning. Just make sure you do not skip the cooling period between layers, or you risk trapping moisture in the coating.
How Many Times Should You Season Cast Iron
If you just bought a new cast iron skillet, you should season it before your first use. Even if the manufacturer says it comes pre-seasoned, adding your own layers improves the performance and longevity of the pan.
For a new skillet, aim for 4 to 6 layers of seasoning. This gives you a solid foundation that will last for months of regular cooking. For a skillet that has been used and abused, you might need to strip it down and start over with 6 layers or more.
After the initial seasoning, maintenance seasoning should happen regularly. Many experienced cast iron users season their pans once a month or whenever they notice food starting to stick. A quick 30-minute seasoning session at 500°F can refresh and strengthen your existing coating.
Here is a simple maintenance schedule:
- New skillet: 4 to 6 layers before first use
- Monthly maintenance: 1 to 2 layers
- After washing with soap: 1 layer to restore the coating
- After removing rust: Full re-seasoning with 4 to 6 layers
- When food starts sticking: 1 to 3 layers as needed
The frequency depends on how often you use your cast iron and how you clean it. Cooking with fat and avoiding harsh detergents helps your seasoning last longer between sessions.
Common Mistakes to Avoid When Seasoning Cast Iron
Even with the best intentions, it is easy to make mistakes when seasoning cast iron. Here are the most common errors and how to avoid them.
Using Too Much Oil
This is the number one mistake people make. Excess oil does not polymerize properly and leaves a sticky, gummy surface. Always wipe the oil on thinly. The pan should look almost dry after you apply it. If you can see pools of oil, you have used too much.
Skipping the Upside-Down Placement
Placing the skillet right-side up allows oil to pool in the corners and crevices. This creates uneven seasoning and sticky spots. Always place the skillet upside down so gravity pulls the excess oil away from the cooking surface.
Not Letting the Pan Cool Gradually
Removing the hot skillet from the oven and placing it on a cold countertop can cause thermal shock. The sudden temperature change can lead to cracking or warping. Always let the pan cool inside the oven as the oven cools down.
Using the Wrong Oil
Not all oils are created equal for seasoning. Olive oil, for example, has a relatively low smoke point and does not polymerize well. It can leave a sticky residue instead of a hard, durable coating. Stick to high-smoke-point oils like flaxseed, grapeseed, or Crisco.
Rushing the Process
Seasoning takes patience. If you cut the baking time short, the oil will not fully polymerize, and your seasoning will be weak and flaky. Trust the process and give each layer the full hour it needs.
Seasoning at Too Low a Temperature
If your oven temperature is too low, the oil will not reach its smoke point and will not polymerize at all. You will end up with an oily, sticky mess instead of a hard, smooth coating. Use an oven thermometer to verify your temperature is accurate.
How to Tell When Your Cast Iron Is Fully Seasoned
Knowing when your cast iron is properly seasoned makes the whole process more rewarding. A well-seasoned skillet has several telltale signs that you can look for.
First, the surface should be smooth and glossy. It should not look matte or dull. Run your fingers across the cooking surface and it should feel almost like a coated pan, not bare iron.
Second, food should not stick. When you cook eggs or pancakes, they should release easily from the surface. If food is sticking, you may need to add more seasoning layers.
Third, the color should be deep and even. A well-seasoned pan often develops a dark, almost black patina that looks beautiful and functions beautifully. Some people love the way a heavily seasoned cast iron skillet looks.
Finally, the pan should be rust-free. A properly seasoned cast iron skillet will resist moisture and stay dry. If you notice any rust spots, it is time to re-season that area.
If you follow the timing and temperature guidelines in this article, you will achieve all of these signs. The key is consistency — thin layers, proper temperature, and enough time in the oven.
Quick Tips for Maintaining Your Seasoned Cast Iron
Once your cast iron is seasoned, keeping it in great shape is easy with a few simple habits. Here are some quick tips that seasoned cast iron users swear by.
- Clean it after every use: Rinse with warm water and use a brush or sponge to remove food residue. Avoid soaking it in water for long periods.
- Dry it immediately: Moisture is the enemy of cast iron. Dry the pan thoroughly with a towel or heat it on the stove for a minute.
- Apply a light coat of oil after washing: This protects the seasoning and prevents rust. A thin wipe of vegetable oil works great.
- Cook with fat regularly: Frying bacon, searing steak, or cooking with butter helps maintain and build your seasoning over time.
- Avoid harsh detergents: Soap can strip your seasoning over time. Use it sparingly, if at all.
- Store in a dry place: Moisture in storage can cause rust even on a well-seasoned pan.
- Re-season when needed: If you notice sticking or rust spots, do a quick seasoning session to refresh the coating.
These habits will keep your cast iron performing beautifully for decades. Many people pass down seasoned cast iron pans to their children and grandchildren. With proper care, your pan can last just as long.
Final Thoughts on How Long to Leave Cast Iron in Oven When Seasoning
Seasoning cast iron in the oven is a simple process once you understand the basics. The answer to how long to leave cast iron in oven when seasoning comes down to a few key factors: temperature, oil type, and number of layers. At 500°F, one hour per layer is the standard recommendation. At 450°F, you may want to extend that to 75 minutes.
Remember to keep your layers thin, your oven temperature accurate, and your cooling process gradual. Avoid the common mistakes we covered, and do not rush the process. Good seasoning takes time, but the payoff is a non-stick, rust-free, beautifully seasoned cast iron skillet that will serve you well for years.
Whether you are a beginner just getting started or a seasoned cook looking to refine your technique, these guidelines will help you get the best results. Start with a clean pan, apply oil thinly, bake for the right amount of time, and repeat as needed. Your cast iron will thank you with every meal you cook.
Now that you know exactly how long to leave cast iron in oven when seasoning, it is time to put this knowledge into action. Grab your skillet, pick your favorite oil, and get baking. You will be amazed at how easy and rewarding the process is. Happy seasoning!
Frequently Asked Questions
Can I season cast iron at 350°F?
Yes, but it will take longer and the results may not be as durable. Most experts recommend 450°F to 500°F for the best polymerization. At 350°F, the oil may not fully break down and bond with the iron, leaving a weaker seasoning layer.
How many layers of seasoning should I apply?
For a new cast iron skillet, 4 to 6 layers is ideal. For maintenance, 1 to 2 layers are usually enough. Each layer should be thin and baked for about one hour at 500°F.
Can I use olive oil to season cast iron?
It is not recommended. Olive oil has a low smoke point and does not polymerize well at seasoning temperatures. It can leave a sticky residue instead of a hard, durable coating. Use flaxseed oil, Crisco, grapeseed oil, or avocado oil instead.
Do I need to let the skillet cool in the oven?
Yes, you should. Letting the skillet cool gradually inside the oven prevents thermal shock, which can cause cracking or warping. Simply turn off the oven and let everything cool down together before removing the skillet.
How often should I re-season my cast iron?
It depends on how often you use it. Most people benefit from a maintenance seasoning once a month or whenever food starts sticking. If you notice rust spots or a dull surface, it is time for a re-seasoning session.
What is the best way to store seasoned cast iron?
Store your cast iron in a dry place with good air circulation. You can place a paper towel inside the skillet to absorb any moisture. Avoid stacking other pans directly on top of it, as this can scratch the seasoning.