How Long To Cook Chicken Thighs In Oven After Searing
This guide reveals exactly how long to cook chicken thighs in oven after searing for perfect results. You’ll learn the ideal oven temperature, timing for bone-in and boneless thighs, and how to achieve crispy skin and juicy meat. With simple steps and expert tips, you’ll master this method every time.
If you’re wondering how long to cook chicken thighs in oven after searing, you’re in the right place. This method delivers crispy, golden skin and tender, juicy meat every single time. Searing first creates a flavorful crust, then the oven gently finishes the job. Whether you prefer bone-in or boneless, knowing the right time and temperature is key. Here’s everything you need to perfect oven-baked chicken thighs after searing.
Many home cooks skip the sear and simply bake chicken. That works, but it won’t give you that deep, caramelized flavor. When you sear and bake chicken thighs, you get the best of both worlds. The Maillard reaction browns the surface, locking in moisture. Then the oven cooks the meat through evenly. This guide breaks down the exact process, timing, and tips so you can repeat it with confidence.
Key Takeaways
- Searing first creates a flavorful crust: A hot pan locks in juices and adds texture before the oven finishes the job.
- Bone-in skin-on thighs need 25–30 minutes at 400°F after searing: This delivers crispy skin and perfectly cooked meat.
- Boneless thighs cook faster: Expect 20–25 minutes at 400°F once seared.
- Always rest the chicken: Let it sit for 5–10 minutes to redistribute juices.
- Use a meat thermometer: The safe internal temperature is 165°F in the thickest part.
- Avoid overcrowding the pan: Give each thigh space for even browning and crispiness.
📑 Table of Contents
- Why Searing Chicken Thighs Makes a Difference
- How Long to Cook Chicken Thighs In Oven After Searing: Time and Temperature Guide
- Step-by-Step: Searing and Baking Chicken Thighs
- Tips for Juicy, Crispy Chicken Thighs Every Time
- Common Mistakes to Avoid When Cooking Chicken Thighs in the Oven
- Expert Insights: Chef Secrets for Perfect Oven-Baked Chicken
- Conclusion
Why Searing Chicken Thighs Makes a Difference
The Science Behind the Sear
Searing isn’t just about looks. When you place chicken thighs in a hot pan, the surface sugars and proteins undergo a reaction called the Maillard reaction. This creates hundreds of new flavor compounds. The result is a rich, brown crust that tastes far more complex than plain baked chicken. Searing chicken thighs also helps render the fat under the skin, making it crispy instead of chewy.
Many people think searing seals in juices. That’s a myth. Searing does, however, create a barrier that slows moisture loss during the later oven stage. The crust holds the juices inside while the oven-baked chicken thighs finish cooking gently. This two-step approach gives you a restaurant-quality finish at home.
Skin-On vs. Skin-Off: Which Sear Better?
Skin-on chicken thighs are the best choice for searing. The skin acts as a protective layer and becomes impossibly crispy when rendered properly. If you remove the skin first, you lose that textural contrast. Boneless, skinless thighs can still be seared, but they brown faster and can dry out more easily.
For the crispiest result, pat the skin completely dry before seasoning. Moisture is the enemy of a good sear. A dry surface browns instantly, while a wet surface steams. This small step makes a huge difference in your crispy skin chicken outcome.
Key Takeaways
- Searing adds flavor and texture: The Maillard reaction creates a complex, savory crust.
- Skin-on thighs give the best sear: Render the fat for crispy, golden skin.
- Dry the skin thoroughly: Pat it with paper towels before seasoning for maximum browning.
How Long to Cook Chicken Thighs In Oven After Searing: Time and Temperature Guide
The exact how long to cook chicken thighs in oven after searing depends on a few factors. Bone-in thighs take longer than boneless. Skin-on thighs need a slightly higher temperature to crisp up. And the starting temperature of the chicken matters too. Here’s a clear breakdown so you never have to guess again.
Bone-In Skin-On Chicken Thighs
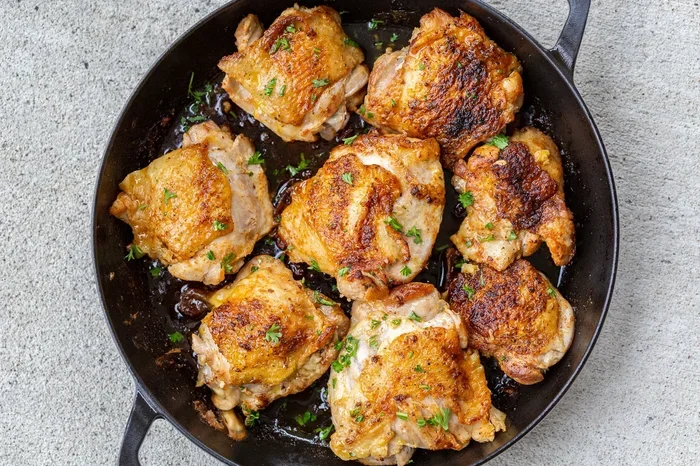
These are the most forgiving and flavorful cut. After searing both sides for about 3 minutes each, place them skin-side up in a hot oven. The bone slows cooking, so the meat stays juicy longer. Bone-in chicken thighs usually need 25–30 minutes at 400°F (200°C). The skin should be deeply golden and crackly when done.
Boneless Skin-On Chicken Thighs
Without the bone, these cook faster. Sear them for 2–3 minutes per side, then bake at 400°F for 20–25 minutes. Because there’s no bone, the meat reaches a safe internal temperature more quickly. Watch them closely after the 20-minute mark to avoid drying out.
Boneless Skinless Chicken Thighs
These are the leanest option and the most prone to drying. Sear quickly over medium-high heat, just 2 minutes per side. Then bake at 375°F (190°C) for 18–22 minutes. The lower temperature gives the meat more time to stay moist. Always use a meat thermometer to check doneness.
Comparison Table: Cooking Times and Temperatures
| Chicken Thigh Type | Sear Time (per side) | Oven Temp | Bake Time After Searing | Internal Temp |
|---|---|---|---|---|
| Bone-in skin-on | 3 min | 400°F (200°C) | 25–30 min | 165°F (74°C) |
| Boneless skin-on | 2–3 min | 400°F (200°C) | 20–25 min | 165°F (74°C) |
| Boneless skinless | 2 min | 375°F (190°C) | 18–22 min | 165°F (74°C) |
Key Takeaways
- Bone-in thighs take longer: The bone adds cooking time but keeps meat juicier.
- 400°F is the sweet spot for most thighs: It crisps the skin without overcooking the meat.
- Always check internal temperature: 165°F in the thickest part is the safe minimum.
Step-by-Step: Searing and Baking Chicken Thighs
Now that you know the timing, let’s walk through the full process. This oven-baked chicken thighs recipe method is simple and foolproof. Follow these steps for consistent, delicious results every time.
Step 1: Prep the Chicken
Remove the thighs from the fridge 15–20 minutes before cooking. This lets them come closer to room temperature, which promotes even cooking. Pat them dry with paper towels, especially if they have skin. Season generously with salt, pepper, and any spices you like. Chicken thighs cooking time improves when the surface is dry and well-seasoned.
Step 2: Heat the Pan for Searing
Place a heavy oven-safe skillet over medium-high heat. Add a thin layer of high-smoke-point oil like avocado or canola oil. Let the pan get truly hot—about 2 minutes. You should see a shimmer in the oil. If you add the chicken too early, it will steam instead of sear.
Step 3: Sear the Thighs
Place the thighs skin-side down in the pan. Resist the urge to move them. Let them sear undisturbed for 3 minutes. You’ll hear a steady sizzle. The skin will turn golden brown and release easily from the pan. Flip and sear the other side for 2–3 minutes. Then transfer the whole skillet to the preheated oven.
Step 4: Bake in the Oven
Set your oven to the correct temperature based on the table above. Bake until the internal temperature reaches 165°F. For bone-in thighs, this usually takes 25–30 minutes at 400°F. Check at the 20-minute mark to prevent overcooking. The skin should look deeply golden and feel firm to the touch.
Step 5: Rest Before Serving
Once the chicken is done, take it out of the oven and let it rest for 5–10 minutes. This allows the juices to redistribute throughout the meat. If you cut too soon, the juices run out and the chicken dries out. Rest chicken after cooking is just as important as the sear and bake steps.
Quick Tips for Perfect Searing
- Use a cast-iron or stainless-steel skillet. Non-stick pans don’t get hot enough for a proper sear.
- Don’t crowd the pan. Give each thigh at least an inch of space so steam escapes.
- If your oven has a convection setting, use it. It circulates hot air for more even browning.
- For extra flavor, add a knob of butter and crushed garlic to the pan during the last 5 minutes of baking.
Key Takeaways
- Bring chicken to room temperature first: This reduces cooking time and ensures even doneness.
- Sear skin-side down first: Render the fat and get that crispy skin.
- Rest the chicken after baking: It stays juicier and easier to slice.
Tips for Juicy, Crispy Chicken Thighs Every Time
Dry the Skin Thoroughly
The single most important tip for crispy skin is to dry it. After rinsing the thighs, pat them completely dry with paper towels. You can even let them sit uncovered in the fridge for a few hours or overnight. This dries the skin further, which leads to a better sear and crunchier result. Crispy chicken skin is all about moisture control.
Use a Wire Rack for Baking
Instead of placing the thighs directly on a baking sheet, set them on a wire rack over a sheet pan. The hot air circulates around the skin, crisping it evenly on all sides. The rack also keeps the bottom of the chicken from sitting in grease, which can make it soggy. This simple trick elevates your oven-baked chicken to restaurant quality.
Brine for Extra Juiciness
If you want the most succulent juicy chicken thighs, try a quick brine. Dissolve 1 tablespoon of salt and 1 tablespoon of sugar in 4 cups of water. Submerge the thighs for 30 minutes to 2 hours. Then pat them dry and sear as usual. The brine helps the meat retain moisture during the oven stage. This is a chef’s secret for consistently tender results.
Finish Under the Broiler
For an extra-crispy skin, switch your oven to the broiler during the last 2–3 minutes of baking. Watch it closely—it can go from golden to burnt in seconds. This technique gives you a beautiful, bubbly, caramelized crust that looks and tastes amazing. It’s an easy way to take your pan-sear chicken to the next level.
Key Takeaways
- Dry the skin overnight: This is the secret to ultra-crispy results.
- Use a wire rack: It promotes even crisping and prevents sogginess.
- Brine for juiciness: A quick salt-sugar soak makes a noticeable difference.
- Broil at the end: This adds an extra layer of crunch and color.
Common Mistakes to Avoid When Cooking Chicken Thighs in the Oven
Overcrowding the Pan
One of the biggest mistakes is fitting too many thighs into the pan. When pieces touch, they steam instead of sear. The moisture trapped between them prevents browning and creates soggy skin. Give each thigh plenty of space. If you need to cook a large batch, use two pans or sear in batches. Your crispy skin chicken depends on this simple step.
Skipping the Rest
It’s tempting to cut into the chicken as soon as it comes out of the oven. But the juices are still bubbling and moving toward the center. If you slice immediately, they spill out onto the cutting board, leaving the meat dry. Always let the chicken rest for at least 5 minutes. Tent it loosely with foil to keep it warm without trapping steam.
Using the Wrong Oven Temperature
Some recipes call for baking seared chicken at 350°F. That temperature is too low for crispy skin. The fat under the skin won’t render properly, and you’ll end up with flabby, pale skin. Stick to 400°F for skin-on thighs. For boneless skinless, 375°F works well. Oven temperature for chicken thighs is the key to balancing crispiness and moisture.
Not Using a Thermometer
Visual cues can be misleading. The chicken might look done on the outside but still be undercooked inside. Or it might look slightly dry because you left it too long. A simple instant-read thermometer takes the guesswork out. Insert it into the thickest part of the thigh, avoiding the bone. When it reads 165°F, it’s safe and perfectly juicy. This is the most reliable way to nail your chicken thighs cooking time every time.
Key Takeaways
- Don’t crowd the pan: Space is essential for a good sear.
- Always rest the chicken: It keeps the meat juicy.
- Use 400°F for skin-on thighs: Lower temps won’t crisp the skin.
- Invest in a meat thermometer: It’s the only way to know for sure.
Expert Insights: Chef Secrets for Perfect Oven-Baked Chicken
Start with a Hot Pan and Cold Oil
Professional chefs often heat the pan first, then add the oil. This prevents the oil from burning and ensures an even sear. Once the oil shimmers, carefully place the chicken in. You should hear an immediate sizzle. If you don’t, the pan isn’t hot enough. A hot pan is the foundation of great how to sear chicken technique.
Season Generously and in Layers
Salt the chicken at least 45 minutes before cooking, or even overnight. This draws out moisture, which then gets reabsorbed, seasoning the meat deeply. Just before searing, add pepper and any other spices. Layering the seasoning creates a more complex flavor profile than simply sprinkling everything on at the end. This method works beautifully for baked chicken thighs that need extra depth.
Let the Chicken Finish at Room Temperature
When you pull the skillet from the oven, the chicken continues to cook from residual heat. This carryover cooking can raise the internal temperature by 5–10 degrees. For this reason, many chefs pull the chicken at 160°F rather than waiting for 165°F. By the time it rests, it will safely reach 165°F. The result is juicier, more tender meat. This is a subtle but powerful trick for perfect finish in oven chicken.
Add Aromatics for Extra Flavor
Toss a few sprigs of fresh thyme or rosemary into the pan with the chicken during the last 10 minutes of baking. The herbs will sizzle in the rendered fat, infusing the meat with a subtle, savory aroma. You can also add thinly sliced onions or whole garlic cloves around the chicken. These aromatics caramelize and create a flavorful base for a quick pan sauce. This simple addition turns a basic oven-baked chicken thighs recipe into a restaurant-worthy dish.
Key Takeaways
- Heat the pan first: It ensures an immediate, even sear.
- Season in layers: Salt early for deeper flavor.
- Pull chicken at 160°F: Carryover cooking brings it to a safe 165°F.
- Add herbs in the last minutes: They infuse the chicken with aromatic flavor.
Conclusion
Mastering how long to cook chicken thighs in oven after searing is easier than you think. The two-step process of searing and baking transforms a simple cut of chicken into something truly special. You get crispy, golden skin and juicy, flavorful meat with minimal effort. Whether you choose bone-in or boneless, skin-on or skinless, the principles remain the same: dry the skin, use a hot pan, bake at the right temperature, and always rest the chicken before serving.
With the times and temperatures laid out in this guide, you have everything you need to succeed. Start with the comparison table to find your exact scenario, then follow the step-by-step process. Add the quick tips and expert secrets, and you’ll be making juicy chicken thighs that rival any restaurant dish. Practice a few times, and this method will become second nature. Your oven-baked chicken will never be the same again.
Now that you know the secrets, it’s time to put them into action. Preheat your oven, grab a skillet, and give this sear and bake chicken method a try. You’ll be glad you did. Enjoy the process, savor the crispy skin, and share the results with family and friends. Happy cooking!
Frequently Asked Questions
Can I sear chicken thighs in a non-stick pan?
You can, but a cast-iron or stainless-steel skillet works best. Non-stick pans don’t get hot enough to achieve a proper Maillard reaction. The sear won’t be as deep or flavorful. If you only have a non-stick pan, use medium-high heat and don’t move the chicken for at least 3 minutes.
How do I know when the chicken is done without a thermometer?
The juices should run clear when you pierce the thickest part. The meat should feel firm, not rubbery, when pressed. However, a thermometer is the most reliable tool. Always aim for 165°F internally to be safe. Without one, you risk either undercooking or overcooking the chicken.
Can I sear chicken thighs ahead of time and bake them later?
Yes, you can sear them and then refrigerate for up to 24 hours. Let the chicken come to room temperature for 15–20 minutes before baking. This ensures even cooking. Searing ahead actually adds more flavor because the crust develops further during a short rest in the fridge.
What temperature should I use for boneless chicken thighs?
Boneless skin-on thighs do well at 400°F for 20–25 minutes after searing. Boneless skinless thighs benefit from a slightly lower temperature of 375°F for 18–22 minutes. The lower temperature gives the leaner meat more time to stay moist without drying out.
Is it better to bake chicken thighs covered or uncovered?
Always bake them uncovered. Covering traps steam and prevents the skin from crisping. The whole point of searing first is to get that golden, crackly crust, and covering the pan would ruin that effect. Let the hot air circulate freely around the chicken for the best results.
Can I use this method for chicken breast?
Yes, but chicken breast cooks faster and dries out more easily. Sear it for 2 minutes per side, then bake at 400°F for 12–15 minutes. Use a meat thermometer and pull it at 160°F to account for carryover cooking. Thinner breasts may need even less time, so watch them closely.