How To Clean Toaster Oven Trays And Keep Them Spotless
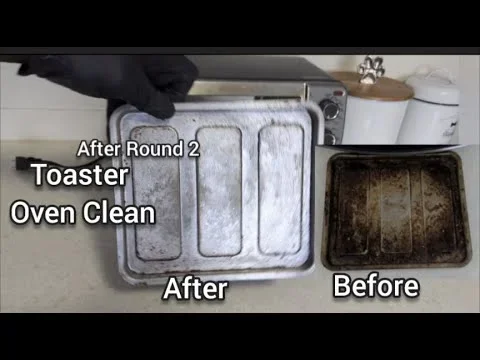
Cleaning your toaster oven trays is easier than you think with the right methods and a few simple household items. This guide shows you how to remove baked-on grease and food residue using baking soda, vinegar, and dish soap. You will learn how to keep your toaster oven trays spotless with minimal effort and no harsh chemicals.
Your toaster oven trays take a beating every day. They catch drips, spills, and baked-on crumbs that seem impossible to remove. But here is the good news. Cleaning toaster oven trays does not have to be a frustrating chore. With the right approach, you can make them look brand new again.
Whether you own a small toaster oven or a larger countertop model, the trays inside need regular care. Grease and food residue build up fast. Over time, this buildup affects how your oven performs. It can even create unpleasant smells when you cook. The great thing is that a few simple methods can handle almost any mess.
In this guide, we will walk you through every step of toaster oven tray cleaning. You will learn natural cleaning methods, easy hacks, and smart habits that keep your trays spotless. No expensive products are needed. Just things you probably already have in your kitchen.
Key Takeaways
- Baking soda and vinegar are the best natural cleaners for greasy toaster oven trays.
- Soaking your trays in hot soapy water loosens baked-on food quickly.
- Avoid abrasive scrubbers that can scratch non-stick toaster oven trays.
- Clean your trays after every use to prevent stubborn grease buildup.
- Regular toaster oven maintenance keeps your trays looking new and working well.
- Dishwasher-safe trays offer the easiest cleaning option for busy households.
- Replace trays when they become warped, discolored, or damaged beyond cleaning.
📑 Table of Contents
- Why Cleaning Toaster Oven Trays Matters
- What You Need to Clean Toaster Oven Trays
- Step-by-Step Guide to Clean Toaster Oven Trays
- Natural Cleaning Methods for Stubborn Messes
- How to Prevent Buildup on Toaster Oven Trays
- Common Mistakes to Avoid When Cleaning Toaster Oven Trays
- Expert Tips for Keeping Toaster Oven Trays Spotless
- When to Replace Your Toaster Oven Trays
- Conclusion
Why Cleaning Toaster Oven Trays Matters
Many people ignore their toaster oven trays until the mess becomes impossible to ignore. That is a mistake. Dirty trays affect more than just looks. They impact your cooking results and the lifespan of your appliance.
Grease Buildup Affects Cooking Performance
When grease coats your trays, it changes how heat moves inside the oven. This means your food may not cook evenly. Burnt-on residue can also smoke during cooking, which affects the taste of your food. Nobody wants their toast tasting like last week’s pizza.
Health and Hygiene Concerns
Old food particles and grease are a breeding ground for bacteria. If you reuse dirty trays, you are essentially cooking on a contaminated surface. This is especially important if you bake or roast food directly on the tray. Regular cleaning keeps your meals safe and healthy.
Extending the Life of Your Trays
Toaster oven trays are not cheap to replace. When you take care of them, they last much longer. Stainless steel toaster trays and non-stick toaster oven trays both benefit from routine cleaning. A little effort now saves you money later.
What You Need to Clean Toaster Oven Trays
Before you start, gather your supplies. The best part is that you do not need anything fancy. Most of these items are already in your kitchen.
Essential Cleaning Supplies
- Baking soda — a gentle abrasive that cuts through grease naturally.
- White vinegar — helps dissolve stubborn residue and deodorizes.
- Dish soap — breaks down grease and lifts food particles.
- Warm water — hot water works best for soaking.
- Soft sponge or cloth — avoids scratching tray surfaces.
- Old toothbrush — great for reaching corners and grooves.
- Aluminum foil — useful for scrubbing without damaging surfaces.
What to Avoid
Stay away from steel wool and harsh chemical scrubbers. These can scratch non-stick surfaces and damage stainless steel. Avoid bleach-based cleaners as well, since they can react with metal trays and cause discoloration. Stick to gentle, natural methods whenever possible.
Step-by-Step Guide to Clean Toaster Oven Trays
Now let us get into the actual cleaning process. Follow these steps for the best results every time.
Step 1: Remove the Trays
Unplug your toaster oven first. Safety always comes first. Let the oven cool completely before removing any parts. Pull out the crumb tray, the main cooking tray, and any racks. Place them on a protected surface like a towel or sink mat.
Step 2: Remove Loose Debris
Use a paper towel or soft brush to wipe away loose crumbs and food pieces. Do not scrape hard at this stage. You just want to remove the big stuff so the soaking process works better. This simple step makes a huge difference.
Step 3: Soak in Hot Soapy Water
Fill your sink or a large basin with hot water. Add a few drops of dish soap. Submerge the trays and let them soak for at least 20 to 30 minutes. For really greasy trays, soak for up to an hour. The hot water softens baked-on grease and makes it much easier to clean.
Step 4: Make a Baking Soda Paste
While the trays soak, mix baking soda with a small amount of water to form a thick paste. This paste is your best friend for toaster oven tray cleaning. It works as a gentle scrub that lifts tough stains without scratching the surface.
Step 5: Scrub the Trays
After soaking, use a soft sponge to scrub the trays. Apply the baking soda paste to any stubborn spots. Use the old toothbrush for corners and edges where grease likes to hide. For non-stick trays, use only gentle pressure. With stainless steel trays, you can apply a bit more elbow grease.
Step 6: Rinse and Dry
Rinse each tray thoroughly with clean water. Make sure no baking soda or soap residue remains. Dry the trays with a clean cloth or let them air dry completely before putting them back in the oven. Moisture left on trays can cause rust or odor over time.
Natural Cleaning Methods for Stubborn Messes
Sometimes regular soap and water are not enough. You need stronger natural methods to tackle baked-on grease and food residue.
The Baking Soda and Vinegar Method
This is one of the most effective clean oven trays naturally techniques. Sprinkle baking soda generously over the entire tray surface. Then spray or drizzle white vinegar over the baking soda. The fizzing reaction helps lift dirt and grease from the surface. Let it sit for 15 minutes, then scrub and rinse.
The Lemon and Salt Method
Cut a lemon in half and dip it in coarse salt. Use it like a scrubber on greasy areas. The citric acid in lemon breaks down grease naturally while the salt provides gentle abrasion. This method also leaves a fresh, clean scent behind.
The Ammonia Fume Method
For extremely tough baked-on residue, try the ammonia fume method. Place a small bowl of ammonia inside a large garbage bag with the dirty tray. Seal the bag and let it sit overnight. The fumes loosen even the most stubborn baked-on food. Open the bag outside and rinse the tray thoroughly in the morning.
The Dishwasher Method
If your trays are dishwasher-safe, this is the easiest option. Place them on the top rack and run a normal cycle with hot water. Add a rinse aid for extra shine. This method works well for regular maintenance but may not handle heavy buildup on its own.
How to Prevent Buildup on Toaster Oven Trays
Cleaning is much easier when you prevent buildup in the first place. A few simple habits can save you a lot of scrubbing time.
Use Parchment Paper or Silicone Mats
Line your trays with parchment paper or silicone baking mats before cooking. These barriers catch drips and crumbs before they reach the tray surface. Just make sure the parchment does not touch the heating elements. This one trick makes clean toaster oven rack and tray maintenance so much simpler.
Clean After Every Use
Get in the habit of wiping down your trays after each use. While the oven is still warm (but cooled enough to touch safely), use a damp cloth to remove any drips or crumbs. This prevents grease from hardening and bonding to the surface. A quick wipe takes less than a minute.
Use the Drip Tray Properly
Most toaster ovens come with a drip tray or crumb tray at the bottom. Check and empty this tray regularly. When it overflows, grease splashes onto the cooking trays and creates more mess. Keeping the drip tray clean is a key part of toaster oven maintenance.
Cook at Lower Temperatures When Possible
High temperatures cause more splattering and faster grease buildup. When your recipe allows, cook at slightly lower temperatures. This reduces the amount of mess your trays have to deal with. It also extends the life of your oven components.
Common Mistakes to Avoid When Cleaning Toaster Oven Trays
Even with the best intentions, people make mistakes that can damage their trays. Here are the most common ones to watch out for.
Using Abrasive Scrubbers
Steel wool, harsh scouring pads, and abrasive sponges can permanently scratch non-stick surfaces. Once the coating is damaged, food sticks even more. Stick to soft sponges, microfiber cloths, and old toothbrushes for safe scrubbing.
Soaking Non-Stick Trays Too Long
While soaking helps with cleaning, leaving non-stick trays in water for days can damage the coating. Limit soaking time to one or two hours maximum. For stainless steel trays, longer soaking is generally safe.
Using Harsh Chemical Cleaners
Strong chemical cleaners can leave behind residues that transfer to your food. They can also damage the tray surface over time. Natural cleaners like baking soda and vinegar work just as well without the risks.
Ignoring Warped or Damaged Trays
If your tray becomes warped, heavily discolored, or the coating starts peeling, it is time for a replacement. Cooking on a damaged tray is not safe and does not produce good results. Check your toaster oven accessories and replace them when needed.
Expert Tips for Keeping Toaster Oven Trays Spotless
Here are some extra tips from cleaning experts that make a real difference in your toaster oven tray cleaning routine.
- Clean the trays right after use while they are still slightly warm. Grease wipes off much easier at this stage.
- Store trays in a dry place to prevent moisture damage and rust formation.
- Season stainless steel trays with a light coat of oil after cleaning to maintain their shine and protect the surface.
- Deep clean your trays monthly even if they look fine. Hidden grease buildup affects oven performance over time.
- Use a damp cloth to wipe down the inside of the oven at the same time you clean the trays. This keeps the entire appliance in top shape.
- Keep a small spray bottle with a vinegar and water solution in your kitchen. Quick sprays after cooking make weekly cleaning much faster.
When to Replace Your Toaster Oven Trays
No matter how well you care for them, toaster oven trays do not last forever. Knowing when to replace them is just as important as knowing how to clean them.
Look for these signs that your trays need replacing. The surface has deep scratches or the non-stick coating is peeling. The tray is visibly warped and does not sit flat in the oven. There is heavy discoloration that does not respond to any cleaning method. Rust has developed on any part of the tray. The tray no longer fits properly or slides in and out smoothly.
Replacing your trays ensures your oven continues to work efficiently. Most replacement trays are affordable and easy to find. Check your toaster oven model number to find the right fit. Keeping clean oven trays and proper oven tray scrubbing habits will extend their life, but eventually every tray needs an upgrade.
Conclusion
Toaster oven tray cleaning does not have to be a difficult or time-consuming task. With the right supplies and a simple routine, you can keep your trays spotless and your oven working at its best. Natural cleaners like baking soda and vinegar handle most messes effectively and safely. Prevention habits like using parchment paper and wiping trays after each use reduce the need for heavy scrubbing.
Remember to clean your trays regularly, avoid common mistakes, and replace them when they show signs of wear. These simple steps keep your toaster oven trays in great condition for years. Your oven will cook better, your food will taste fresher, and your kitchen will stay cleaner. Start today and make toaster oven tray cleaning part of your regular kitchen routine. You will be glad you did.
Frequently Asked Questions
How often should I clean my toaster oven trays?
You should clean your trays after every use for best results. A quick wipe while the tray is still warm removes most grease and crumbs. For a deeper clean, do a full scrub at least once a week or whenever you notice buildup.
Can I use steel wool to clean my toaster oven trays?
No, steel wool can scratch and damage both non-stick and stainless steel trays. Use a soft sponge, microfiber cloth, or old toothbrush instead. These tools clean effectively without harming the tray surface.
What is the easiest way to remove baked-on grease from toaster oven trays?
The baking soda and vinegar method works best for baked-on grease. Make a paste of baking soda and water, apply it to the greasy areas, then spray vinegar on top. Let it sit for 15 minutes, scrub gently, and rinse clean.
Are toaster oven trays dishwasher-safe?
Many toaster oven trays are dishwasher-safe, but always check your owner’s manual first. Dishwasher cleaning works well for regular maintenance. For heavy grease buildup, hand washing with baking soda paste gives better results.
Can I use bleach to clean my toaster oven trays?
It is best to avoid bleach on metal trays. Bleach can cause discoloration and react with the metal surface. Stick to natural cleaners like baking soda, vinegar, and dish soap for safe and effective cleaning.
How do I know when my toaster oven tray needs to be replaced?
Replace your tray if it shows deep scratches, peeling coating, heavy warping, or rust. A damaged tray does not cook food evenly and can affect the taste and safety of your meals. Most replacement trays are inexpensive and easy to find online.